Rook endgames: the 5 positions that decide most club games
Rook endgames are the ones you actually get. Knights and bishops get traded off; the queens come off in time trouble; you land in king, rook, and a pawn or two, and the game that felt decided turns into a long grind you have never practised.
Five positions cover almost all of that grind. Not because chess is simple, but because most club rook endings are trying to become one of these, or trying to avoid one of them. Learn the shapes. The rest is technique you can pick up by playing them out against the engine.
1. Lucena: building a bridge
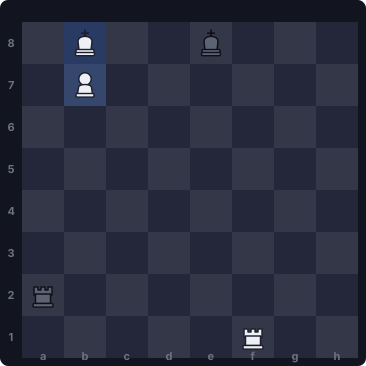
White’s king is in the way of its own pawn. Black’s rook checks from the long side, and if you just step out, the checks never stop.
The method has a name because it is a method, not a calculation:
- Check the defending king away from the pawn’s file (
Rd1+). - Park the rook on the fourth rank (
Rd4). That is the bridge. - Walk the king out. When the checks come, they run into the rook. The pawn queens.
It works for any pawn except a rook pawn. The fourth rank matters: a bridge on the fifth can still win, but it is the version with a trap in it. Put the rook on the fourth and the rest is walking.
If you are the defender, your job was to prevent this position from existing. Once the pawn is on the seventh and your king is cut off, you are hoping for a mistake, not a theory.
2. Philidor: the third-rank defense
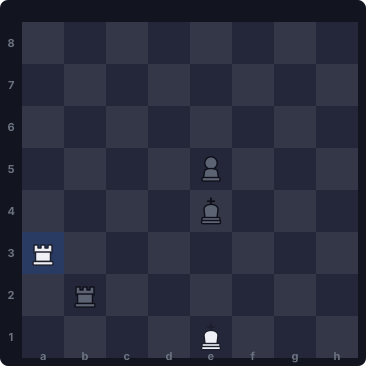
The drawing position. Your king sits on the square the pawn wants to queen on, or next to it. Your rook sits on your third rank and refuses the enemy king entry.
Wait. Shuffle the rook along the third rank. If they check from the side, keep the king in front of the pawn. If they offer a rook trade, take it: king and pawn versus king is a draw from here.
The one moment you have to notice: when the pawn steps onto the third rank, the rook’s job on that rank is over. Go to the far end of the board and check from behind. The attacking king has no cover. Checks forever, pawn falls or they repeat.
The losing mistake is leaving the third rank too early, letting their king in, and discovering that you are now defending against Lucena.
3. Rook behind the passed pawn
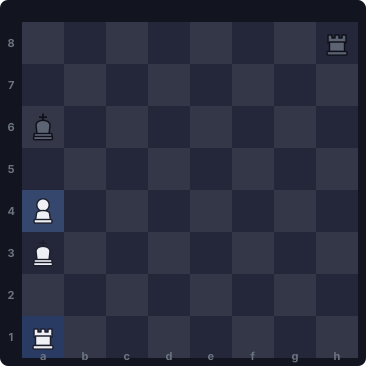
Tarrasch’s rule is a proverb because it is usually true: put the rook behind the passed pawn, whether it is yours or theirs.
Behind your own pawn, the rook supports every step and stays active as the pawn advances. Behind theirs, the rook holds it from a distance and you are not stuck in front of a passer that is about to queen on your head.
Club games violate this constantly. The rook steps beside the pawn to “guard it,” the king gets checked away, and the pawn is suddenly hanging. If you remember one sentence from this post when you have twenty seconds left, remember this one.
4. The cut-off king
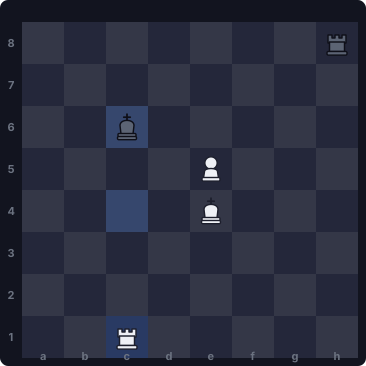
Before Lucena there is a simpler win: the enemy king cannot get in front of the pawn. A rook on a file between that king and the passer does the whole job. The pawn and your king walk. Their rook has to deal with both.
This is why “active rook” is not a slogan. A rook that checks from the side for one move and then comes home has given the king a file. A rook that stays on the cut-off file is worth more than a pawn in a lot of these endings.
If you are defending, getting the king in front of the pawn — back toward Philidor — is worth a pawn, a check, almost anything that does not hang the rook. A king stuck on the edge while a passer runs is how club games finish after the “equal” rook ending.
5. The rook pawn: do not Lucena this
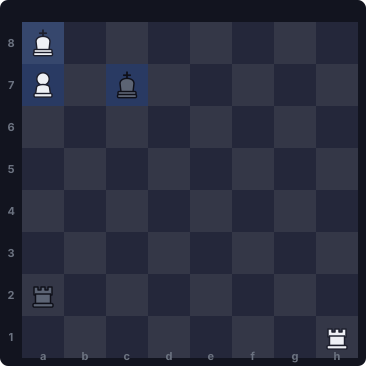
Lucena needs a file on each side of the pawn for the king to step out and for the rook to build the bridge. An a-pawn or h-pawn does not have that. The defending king, once it is close, boxes yours into the corner. The defending rook checks on the file or the rank and you have no shelter.
You can still win some rook-pawn endings — usually when the defending king is cut off by several files, not one. You cannot win them by copying the bridge from position 1. Trying is how a won game becomes a draw you do not understand.
If you are defending against a rook pawn, get the king toward the corner. If you are attacking with one, cut their king off a long way away, or trade into a king and pawn ending you have actually checked.
How to practise this
Set each position up against the engine, both sides, until the win or the draw is boring. Boring is the goal. In a game you will have seconds, not a quiet room, and the only positions you convert under that pressure are the ones you can play while barely looking.
Rook endings are also where the eval graph’s “wall” lives: a winning position that stays winning all the way to the end, or wobbles because conversion is a separate skill. These five shapes are that skill, condensed.